Saturday, May 16, 2015

Websocket in Java

Covered the fundamentals of web sockets (vs HTTP) in the previous post, here

WebSocket protocol is part of HTML5 specification to provide full-duplex bi-directional communication channel over single TCP socket. It got added in Java EE version 7 (JRS 356). In this post, I will dig dipper into WebSockets and how can we implement it in Java. 


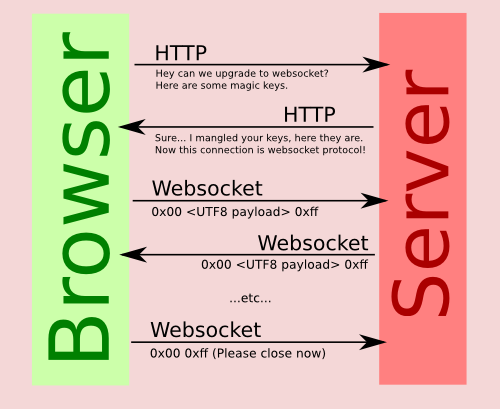
WebSocket uses HTTP connection to bootstrap itself. HTTP sends a normal request to initiate WebSocket connection but it has upgrade header (wiki link). Through this upgrade header, clients say that it would like to upgrade current HTTP connection to a different protocol connection.  If sever has support for it websocket connection gets established. Once the connection is established, both ends can transfer data.


Life Cycle of WebSockets

  1. The client sends an HTTP request to the server with an upgrade header having value websocket.
  2. If Server supports WebSockets then it responds with HTTP header having status code 101, which means now onwards the connection is upgraded to WebSockets (no more HTTP).
  3. Now both client and server can send any number of messages to each other.  Server needs to obtain the session object to send message to client. 
Image Source

Client Request
GET /chat HTTP/1.1
Host: server.example.com
Upgrade: websocket
Connection: Upgrade
Sec-WebSocket-Key: x3JJHMbDL1EzLkh9GBhXDw==
Sec-WebSocket-Protocol: chat, superchat
Sec-WebSocket-Version: 13
Origin: http://example.com

Server Response
HTTP/1.1 101 Switching Protocols
Upgrade: websocket
Connection: Upgrade
Sec-WebSocket-Accept: HSmrc0sMlYUkAGmm5OPpG2HaGWk=
Sec-WebSocket-Protocol: chat

Implementation

Specification JRS 356, covers standards for Java client side as well as server-side WebSocket implementation. This is part of Java EE 7, so all Java EE 7 compliant application servers should provide WebSockets support. There are also independent libraries/jars which can be used to support this feature on non EE 7 compliant servers. 

Any POJO class can be turned into a WebSocket server endpoint by annotating it properly. As shown in below diagram, the class needs to be annotated with @ServerEndPoint and specify URL as the value. You just need to provide implementations of the callback methods which will be called appropriately during the lifespan of the connection. Your server will ensure that these methods get invoked appropriately.


Just like a server endpoint, client endpoint can also be created in Java by annotating the class with @ClientEndPoint and by providing implementations of lifecycle methods. WebSocket client endpoint initiates the connection and WebSocket server endpoints await for the request and establish it. Once the connection is established the request data will be received in the onMessage callback method. So this is the place where business logic will be put. Both client and server can keep sending the data to the other party unless the connection is closed.

Over the internet, clients will mostly be a browser, so make sure that your browser supports this. Both endpoints (client and server) have callback listeners- onOpen, onMessage, onError, onClose.

Please refer to this link which describes steps to create WebSocket in Java.

I have also hosted a hello world WebSocket application on GitHub (websockets).

Security

This is a new technology and hence concern for security is legitimate. Here is a nice article which covers some of the important aspects. 

Final Note

  1. WebSocket protocol is supported in major browsers- Chrome, IE, Firefox, Safari. It also requires support from the server web app. Check for its support on your Android/iOS version if you want to use it for the mobile client. 
  2. It opens connections on TCP port 80. 
  3. WebSockets transmissions are described as messages, where a single message can be optionally split across several data frames. 
  4. Good to validate Origin header before establishing connection on server side to avoid any security threat. 
  5. WebSocket protocol defines a ws:// and wss:// prefix to indicate a WebSocket and a secure WebSocket connection, respectively. 
  6. WebSocket is stateful (unlike http which is stateless), so it doesn't scale up nicely. 
  7. One of the issue with WebSockets is that, what if proxy times out connection after some inactivity? Client and server should re-handshake to ensure that connections gets established again. 
  8. Another legitimate question is, what if either of proxy or browser doesn't support it. You can use portable frameworks like Atmosphere. It transparently falls back to HTTP in such case. 

References:

---
keep coding !

HTTP vs WebSockets

HTTP is like walkie-talkie; data transmission can happen from only one direction at a time. WebSocket is like a telephone; data transmission can happen from both direction at the same time. 

Walkie-Talkie / HTTP

Telephone / WebSocket

Image source

HTTP

In HTTP both ends can transfer data but only one at a time. HTTP clients (like browsers) asks for data from the server by sending the request and then the server parses the request, understands it and responds appropriately by transferring response data back to the client. HTTP was designed to be half-duplex. 

HTTP was not designed to be highly interactive. This means if the server has some new data to push to a client, it waits for client to ask for it. The server has no way to just transfer the data as and when it wishes. There are work-arounds to overcome this limitation like polling and long-polling. In polling, the client keeps making request to the server in regular intervals and server responds back if there is any data available, otherwise, the request gets ignored by the server. In long-polling client makes a call and server keeps connections open and waits for a fixed time for data to be available and then responds back to the client (or times out). Long polling is also known as Comet. Clearly, both alternatives for interactive communication (from both-ends) are not efficient and not ideal of real-time applications like chat.

WebSocket

Above limitations clearly, suggest that there was a need for more reliable bi-directional (full-duplex) communication between two endpoints (in web-world known as client and server). WebSockets allows bi-directional communication from both ends at the same time. This means, even servers can create connection and push data to a client.  It enables more interactive and real-time communication between client and server. WebSocket packets are lightweight compared to HTTP packets and in a single connections client/server can push multiple messages. So, it's more efficient than HTTP.


Note:  Both HTTP, as well as WebSockets, use TCP.

References:
http://www.html5rocks.com/en/tutorials/websockets/basics/

Saturday, April 25, 2015

Ant Cheat Sheet

This post list some of the commonly used ant commands and shortcuts.

Test if ant is installed
$ant -version
Ant is a command-line tool so it must be on the path to be used. If Ant is installed, above command will return version details otherwise it will say that ant command is not found (i.e. Ant is not installed).

It gives below response when I run it on my Mac:
Apache Ant(TM) version 1.9.2 compiled on July 8 2013

Running ant target(s)
$ant                                     //runs default target
$ant compile                       //runs compile target
$ant <target1> <target2>    //runs multiple targets

Generate verbose log during build
$ant -verbose        //runs default target in verbose mode
$ant <target> -verbose
$ant <target> -v   // v is shortcut for verbose
Ant produces verbose log when invoked with -verbose (or -v) parameter. This is useful to figure out what's going out during build and specially when build fails.

Generate debug log during build
$ant -debug                 //runs default target in debug mode
Debug prints more log information than verbose. This option prints lot more low-level details along with verbose details.
$ant -quiet                  //to see nothing but errors and final build status message
$ant -keep-going        //tells ant to try to recover from failure

List all targets
$ant -projecthelp        //or -p
$ant -p -verbose         // list sub-targets as well
Lists all the targets provided by build file. Ant list only public targets with optional description attribute. To see optional targets also along with main targets run above command with -verbose.

Pass a property dynamically

$ant execute -Dproperty=value
Passes a key value (property) pair to the ant build. This will override if the property already exist in the build or config file.

Get build sequence
Target dependency is transitive. So if the build file is quite huge then knowing the dependency becomes quite difficult. To get it, I often run the build in verbose mode and then grep for the given String.

$ant -v main | grep "Complete build sequence is"
Complete build sequence is [clean, compile, execute, main, ]

Help
$ant -help     //or -h
If you don't remember this cheat sheet, just ask ant to help. It will give all the options which ant supports. I have covered some of them here, but some other useful options like providing your own build file other than build.xml etc are not covered here.


Tuesday, April 14, 2015

Functional Interfaces in Java 8

This post compliments the previous post where I have discussed about Lambda Expression, link. To unleash the power of lambda, a good understanding of functional interface is must. Let's briefly cover it:

Functional Interface

Functional Interfaces are those Interfaces in Java which has only one abstract method. Interfaces having single method (like Runnable, Callable, Comparable etc) existed in Java even before version 8. It's just that this new term was coined in context of Lamda Expression.

Functional interfaces are pre-condition for Lambda expression. Lambda expression allows you to provide the implementation of the method inline as an anonymous implementation of the interface.   Before Java 8, programmers used to provide implementation of functional interfaces using Anonymous class (which let you declare and instantiate the class at same time). Below is mostly commonly seen way to implement a Runnable task. 

  Runnable task = new Runnable(){
    public void run(){
        //implementation...bla bla.
  }
};

If interface is NOT functional, implementing the interface or providing anonymous implementation as shown above are two options. But if there is just one abstract method in the interface, Java 8 provides a more succinct and less verbose style to provide implementation. Java also introduces an optional annotation to mark an interface as functional. 


@FunctionalInterface
public interface MyFunctionalIf {
public String doSomething(String);

}

Annotation is used to indicate that the interface is intended to be functional interface. It's not mandatory to use the annotation but definitely a good practice. This annotation will also prevent you to accidentally add another method and break the functional contract of having just a single method. One important point to keep in mind is that default and static methods don't break the functional contract. 
Above interface can be used by implementing it in a concrete class or by providing ad-hoc implementation using anonymous class as shown for Runnable. 

Implementing Functional Interface using Lambdas

Functions were not first class citizen (before Java 8) and you need to have a handle of object to call/use method. Now let's see how lambda changes the implementation of functional interfaces:

Runnable lambdaTask = () -> { //implementation  };
lambdaTask.run();  //using lambda

MyFunctionalIf myFunctionalIf = (String message) ->  "hello "+ message;
myFunctionalIf.doSomething("Sid");   //using lambda

                                                                                   
Now, look how cleaner the functional implementation of the interfaces look. It's very concise, flexible and re-usable.

Please note that in second case, the curly brace as well as return clause is missing (both can be removed if there is only one line in the method body. Even type in argument is optional, so you can ignore String in above lambda expression. Notice that the name of the method is missing in lambda so it is also called as anonymous method

Default Method

Now interfaces can also provide a default methods. Obviously, functional interfaces can also have any number of default methods. You just need to add default keyword in method definition.

List<> interface adds a sort method so that you can sort a list by calling sort method on its instance instead of calling sort method from Collections utility class.

default void sort(Comparator<? super E> c) {
     //implementation 
}

In-built Functional Interfaces Added In Java 8

Imagine creating your own multiple functional interfaces. But, Java helps programmers by providing some reusable functional interfaces out of the box. 

Java designers have created a separate package for same, java.util.funtion.

So do check this package before creating your own functional interfaces. Chances are high that you will find one matching your needs.

---
keep coding !!!

Sunday, March 29, 2015

Euclid's GCD Algorithm

Before turning our head to Euclid's algorithm for calculating GCD, let's cover the more fundamental approach to calculate GCD.

GCD (Greatest Common Divisor)

GCD of two integers A and B is the largest integer that divides them both without a remainder. It is also known as GCF(Greatest Common Factor), HCF(Highest Common Factor) and GCM(Greatest Common Measure).

So GCD(A, B) will be between 1 and min(A, B), both inclusive. So it can be implemented as shown below:

 public int gcd(int a, int b) {
   for (int i = Math.min(a, b); i > 1; i--) {
     if (a % i == 0 && b % i == 0) {
       return i;
     }
   }
   return 1;
 }

Euclid's Algorithm

Above algorithm is not very efficient, as in worst case it can end up doing min(a,b) modulo operations. Euclid's or Euclidian algorithm is an efficient algorithm for calculating GCD of two numbers. And due to its efficiency and simplicity, it is one of the oldest numerical algorithms which is still in use. This algorithm iterates over the two numbers until the remainder is 0. 

To calculate GCD,
Express first in terms of the second number i.e. A = B*K + C
Now repeat the operation for K and C (until C is 0)
The last non-zero remainder is GCD. 

GCD(18,12) => 18 = 12*1 + 6
GCD(6,1)    =>  6 = 1*6 + 0
GCD = 6

Recurrence relation would be:
GCD(A,0) = A
GCD(A,B) = GCD(B, A mod B), for B>0

Implementation

Recursive implementation is quite trivial:

public int euclidGcd(int a, int b){
  if(b ==0 ) return a;
  return euclidGcd(b, a%b);
}

--
keep coding !!!